Phylogenetics: FDPPDiv

|
EEB 5349: Phylogenetics |
| In this lab you will learn how to use the program FDPPDiv, written by Tracy Heath. FDPPDiv offers two alternative approaches to divergence time estimation. The DPPDiv part refers to the Dirichlet Process Prior (DPP) model for divergence time estimation, and the F prefix (for Fossil) refers to the new Fossil Birth-Death approach. Rather than analyze real data, today you will be simulating sequence data using the program Seq-Gen. This is a good way to learn about how to interpret output from a program you are not yet familiar with because you know the true values of all parameters. In addition, you will learn a useful skill: how to download, compile, and run C and C++ programs from within your home directory on the cluster that are not yet installed for general use. |
Contents
Download the C++ source code for FDPPDiv
qlogin
First, login to the cluster and use qlogin to get off the head node and begin a session on a compute node.
curl
The latest release of the FDPPDiv program can be found at its GitHub site. You could download the tar.gz file there and then move it to the cluster using, for example, Cyberduck, but instead let's download it directly into your home directory on the cluster using curl. Here is how to use the curl (copy url) program to download the source code for FDPPDiv:
curl -L https://github.com/trayc7/FDPPDIV/archive/v1.2.1.tar.gz > fdppdiv-1.2.1.tar.gz
The curl manual page says this about the -L (location) option: "If the server reports that the requested page has moved to a different location..., this option will make curl redo the request on the new place." It is nearly always a good idea to include the -L option with curl, as many web sites for software perform redirects.
The curl command copies the file v1.2.1.tar.gz from the specified url and saves it in your home directory as the file fdppdiv-1.2.1.tar.gz. There is nothing wrong with saving the file under the same name, but the original name v1.2.1.tar.gz doesn't give us any hint about what is included (other than that it is version 1.2.1), so I added the program name to the file name when it was saved.
What does tar.gz mean?
The extension tar.gz implies that this is a compressed archive that will unpack into a directory containing many files. The abbreviation tar refers to the tar command, which we will use next to unpack the archive. The command name "tar" stands for "tape archive", which belies the age of this program, which was used in the old days to concatenate all files in a directory into a single file that could be saved onto a magnetic tape. The tar command has survived, whereas magnetic tapes have given way to hard drives.
The gz part of the extension tar.gz tells you that the file is compressed. The tar command just concatenates files, whereas the gzip program compresses a file, adding the suffix gz to the name.
tar
You could uncompress the fdppdiv-1.2.1.tar.gz to create the (larger) file fdppdiv-1.2.1.tar (often called a "tarball"), and then in a second operation you could use the tar command to "untar" the tarball. We will instead use tar to both uncompress and untar the file as follows:
tar zxvf fdppdiv-1.2.1.tar.gz
The option "z" tells tar to uncompress the file.
The option "x" tells tar to extract (untar) the resulting tar archive.
The option "v" tells tar to be verbose and tell us what is going on (i.e. list each file name as it is extracted).
The option "f" says that the file name to extract is coming next on the command line. You should be sure "f" is the last option given to tar before the file name for obvious reasons.
After executing the tar command, you should find that you have a new directory in your home directory named FDPPDIV-1.2.1.
cd into that directory and you will find two subdirectories (example and src) as well as a README file.
cat the README file: it gives some literature citations and some web sites you might be interested in visiting.
Now cd into the src directory to prepare for the next step.
Compile FDPPDiv
Source code vs. executable programs
What you've downloaded is not the FDPPDiv program, but the C++ source code that can be used to create the FDPPDiv program. Computer software comes in many shapes and sizes.
In scripting languages like Python and R, the source code is the program. You pass these "scripts" to the Python or R interpreter and they translate them on the fly into binary machine code that the computer understands (i.e. a series of 1s and 0s).
Languages like Java are intermediate: Java source code gets compiled into something like machine code (called bytecode) that can be quickly converted into machine code on whatever operating system it is run under.
Finally, there are the compiled languages (Fortran, C, C++, Pascal, etc.). Programs written in these languages must be converted completely (compiled) to machine code before they can be executed. The benefit of compiled languages is that they produce the fastest-running programs. The downside is that they are less convenient: any change made to the source code requires recompilation and the result will run on only one platform (i.e. Windows, Mac, Linux). Because of the operating system specificity, authors of programs that must be compiled often just distribute the source code and let users compile it on whatever system they wish to run it on. That is the case with FDPPDiv.
make
You should now be in the directory ~/FDPPDIV-1.2.1/src (the tilde ~ is short for your home directory). If the pwd command says you are somewhere else, navigate to that directory now and type the following:
make dppdiv-seq-sse
This will compile one version of FDPPDiv: there are several versions that could be compiled depending on the capabilities of the compiler and processor, and some of these cannot be built on our cluster because the processors do not have the appropriate technology.
The make command looks for a file named Makefile in the current directory that contains instructions on how to build the software. As make runs, you will see many lines that start with g++:
g++ -DHAVE_CONFIG_H -O2 -fomit-frame-pointer -funroll-loops   -c -o dppdiv.o dppdiv.cpp
g++ -DHAVE_CONFIG_H -O2 -fomit-frame-pointer -funroll-loops   -c -o Alignment.o Alignment.cpp
g++ -DHAVE_CONFIG_H -O2 -fomit-frame-pointer -funroll-loops   -c -o MbEigensystem.o MbEigensystem.cpp
.
.
.
g++ -o dppdiv-seq-sse -O2 -msse3 -D_TOM_SSE3 dppdiv.o Alignment.o MbEigensystem.o MbMath.o
MbRandom.o MbTransitionMatrix.o Mcmc.o Parameter.o Parameter_basefreq.o Parameter_exchangeability.o
Parameter_rate.o Parameter_shape.o Parameter_tree.o Parameter_cphyperp.o Parameter_treescale.o
Parameter_speciaton.o Parameter_expcalib.o Calibration.o Model.o Model_likelihood-seq-sse.o
Each of these lines represents a command that you could run yourself; make just automates the process for you. The g++ command is the Gnu C++ compiler, which is the standard C++ compiler on Linux operating systems. The first line involves compiling the source code file dppdiv.cpp into an object code file dppdiv.o. Once all source code files are compiled into their ".o" object code equivalents, these object code files are linked together by a type of program called (not surprisingly) a linker. The g++ command serves as both compiler and linker, and the last line of output that I've shown above represents the linking phase, where g++ is handed a bunch of ".o" files and is told to link them together into a single executable named dppdiv-seq-sse (the "-o" switch provides the desired name of the executable).
Once the program is compiled, you should see a file named dppdiv-seq-sse appear in the src directory.
Create a directory (~/fbdlab) to use for this lab
Use the following command to create the directory fbdlab (which stands for "fossil birth-death lab") in your home directory:
mkdir ~/fbdlab
(The tilde ~ can always be used as an alias for your home directory.)
Now move the dppdiv-seq-sse executable to that directory:
mv ~/FDPPDIV-1.2.1/src/dppdiv-seq-sse ~/fbdlab
Throughout this lab exercise, we will move the necessary pieces (data file, tree file, fossil calibration file) into this directory so that we can then run FDPPDiv.
Simulate a tree and sequence data
Before analyzing a real example, let's begin by analyzing a simulated data set. This is always a good idea when using a phylogenetics program for the first time. Because you know the truth in the case of simulated data, this provides a sanity check to make sure you are interpreting the output of the program correctly. Today we will simulate a tree using the Yule pure-birth process, then generate sequence data based on the simulated tree under a strict clock model using the popular Seq-Gen program, and finally analyze the simulated data set using FDPPDiv.
First, simulate a tree
I have written a Python program (yuletree.py) that simulates a Yule tree for any number of taxa and using a speciation rate that you specify. Feel free to take a look at this program and modify it if you like for your own purposes later.
It would be arguably better to simulate a tree that involves extinction as well as speciation events (the FDPPDiv program expects some degree of extinction), but when using simulation to learn about using a new program it is best to keep things as simple as possible. There is a companion program, FossilGen, that simulates trees, sequences and even fossils that better match the assumptions of FDPPDiv, in case you are interested in pursuing this approach further after the course.
You can download yuletree.py to your own laptop by clicking here, but today we will just use it on the cluster, so use curl to get it into your home directory:
curl -L http://hydrodictyon.eeb.uconn.edu/people/plewis/courses/phylogenetics/labs/yuletree.py > yuletree.py
Run the program as follows to generate a Yule tree with 20 tips using a speciation rate 1:
python yuletree.py 20 1.0 1
The first number after the program name, 20, is the number of taxa (tip nodes) that the simulated tree should have. The second number, 1.0, is the birth rate (i.e. speciation rate). The third number is the number of trees to generate. Later (not now!) you may wish to run yuletree.py and specify a larger number of trees (e.g. 100). This will generate a tree file that you can peruse with FigTree to give you a feel for what Yule trees look like.
Note the expected tree height and expected tree length reported when yuletree.py runs. These two numbers will be important later. Also, write down the random number seed used in case your simulation turns out to be particularly interesting (one corollary of Murphy's Law says that if you don't write the seed down, it is be guaranteed to be interesting!). If you run yuletree.py again and specify this random number seed as the last number on the command line, it will exactly repeat the previous analysis.
The yuletree.py program saves the simulated tree in two ways:
- the yulesim.tre file is a NEXUS tree file that you should download to your laptop and view using FigTree
- the yulesim.txt file contains just the tree description. You can view this using cat yulesim.txt
Second, download and compile Seq-Gen
For simulating sequence data, we will use the venerable Seq-Gen program, written by Andrew Rambaut, who is also responsible for BEAUTi, FigTree, Tracer, much of BEAST, and many more useful programs. Like FDPPDiv, Seq-Gen is distributed as a compressed tar archive containing source code, so you will need to compile it in order to use it. The steps below should be somewhat familiar now that you've gone through this process once already for FDPPDiv.
Download the Seq-Gen gzipped tarball using curl:
curl -L http://tree.bio.ed.ac.uk/download.php?id=85 > sg.tar.gz
Unpack sg.tar.gz using tar:
tar zxvf sg.tar.gz
Navigate to the source directory:
cd Seq-Gen.v1.3.3/source
Use the ls command to see what's there:
ls
You should see a lot of files ending in ".c" and ".h", plus the Makefile. This program is written in the C language (FDPPDiv was written in C++, which is a derivative of C).
Compile Seq-Gen using make:
make
This will produce the following output:
cc  -O3 -c seq-gen.c
cc  -O3 -c global.c
cc  -O3 -c evolve.c
cc  -O3 -c model.c
cc  -O3 -c nucmodels.c
cc  -O3 -c aamodels.c
cc  -O3 -c eigen.c
eigen.c:38: warning: conflicting types for built-in function 'cexp'
cc  -O3 -c treefile.c
cc  -O3 -c progress.c
cc  -O3 -c gamma.c
cc  -O3 -c twister.c
cc  -O3 -o seq-gen seq-gen.o global.o evolve.o model.o nucmodels.o aamodels.o eigen.o treefile.o progress.o gamma.o twister.o -lm
Note that this time make used the C compiler cc rather than the C++ compiler (g++) used previously for compiling FDPPDiv. The last line is the link stage, where all the object files (with ".o" endings) are linked together to create the executable file seq-gen. (You can generally ignore warnings such as the one reported here; if there is an error, however, the linker will not be able to generate the executable.)
You should now see the executable seq-gen in the source directory. Let's use it now to simulate sequence data.
Third, simulate the sequence data
Move the seq-gen executable file to the fbdlab directory you created earlier:
mv seq-gen ~/fbdlab
Now move the yulesim.txt and yulesim.tre files you generated earlier to this same directory (I am assuming it is still in your home directory):
cd ~
mv yulesim.txt fbdlab
Seq-Gen comes with excellent documentation (download the contents of the documentation directory to your laptop and open Seq-Gen.Manual.html with a web browser to view it), but for the sake of time I will spare you the effort of figuring out how to use the program. Run seq-gen as follows:
./seq-gen -mHKY -l5000 -n1 -p1 -s0.1 -f0.25,0.25,0.25,0.25 -t2.0 -z1226548 -op < yulesim.txt > simulated.dat
Here is a summary of the options we used:
- -mHKY means use the HKY model
- -l5000 means generate sequences of length 5000 sites
- -n1 means generate just 1 simulated data set (-n10 would generate 10 data sets)
- -p1 means place all data in one partition subset (i.e. don't partition)
- -s0.1 means use 0.1 as the tree scaling factor (this value effectively multiplies all edge lengths by 0.1)
- -f0.25,0.25,0.25,0.25 specifies the nucleotide frequencies (all equal in this case)
- -t2.0 specifies the transition/transversion ratio (this is not the rate ratio kappa)
- -z1226548 specifies the pseudorandom number seed to use
- -op specifies that the output file should be in phylip format, which is what FDPPDiv expects (use -on for nexus, but not for this exercise!)
- < yulesim.txt provides the tree description to seq-gen (the redirection operator < makes it appear to seq-gen as if the tree description were typed in by you)
- > simulated.dat saves the output of seq-gen to the file simulated.dat (without this redirection, seq-gen would spit out the sequence data to the screen, which is not very helpful)
After running seq-gen, you should now see the file simulated.dat in your ~/fbdlab directory.
- Why scale the tree by 0.1 in simulating sequence data? answer
Run PAUP*
Before trying FDPPDiv, let's first run PAUP* to see what maximum likelihood says about our simulated data.
Be sure that the yulesim.tre file you generated using yuletree.py is in the same directory (~/fbdlab) as the simulated.dat file, then create a paup command file named paup.nex (or whatever you prefer) in that same directory containing the following:
#nexus

begin paup;
  tonexus from=simulated.dat to=simulated.nex format=phylip replace;
  exe simulated.nex;
  set criterion=likelihood;
  lset clock nst=2 basefreq=estimate tratio=estimate rates=gamma shape=estimate pinvar=estimate;
  gettrees file=yulesim.tre;
  describe 1 / brlens plot=phylogram;
end;
This will first convert the phylip-formatted simulated.dat file into a nexus file, then PAUP will execute that nexus file. It will load in the tree you used for the simulation and estimate parameters on that tree using a strict molecular clock and the HKY+I+G model. The describe command will output a list of branch lengths and parameter values, allowing us to check how accurately parameters can be estimated from our simulated data.
Run PAUP* as follows (you should still be in a qlogin session):
paup paup.nex
- What is the tree length reported by PAUP? answer
- What tree length did you expect? answer
- What are the base frequencies reported by PAUP? answer
- What base frequencies did you expect? answer
- What is the transition/transversion ratio reported by PAUP? answer
- What transition/transversion ratio did you expect? answer
- What is the proportion of invariable sites and gamma shape reported by PAUP? answer
- What proportion of invariable sites and gamma shape did you expect? answer
Run FDPPDiv
We now have a data file (simulated.dat), a tree (yulesim.txt) and the FDPPDiv executable (dppdiv-seq-sse) in place, and the only other thing that is needed is a file describing our "fossil" calibrations. I've put fossil in quotes because we will make up fake fossil data (to go with our fake sequence data). In order to create a fake fossil that makes sense, you will need to download the yulesim.tre file to your laptop and view it with FigTree. Click the scale bar checkbox to place a time scale below the tree, and check the reverse axis checkbox so that the time scale starts with 0 at the tips (on the right) and increases toward the root (at the left). Choose a node somewhere close to the middle. If that node is at, say, 1.52, on the scale, and if this node represents the most recent common ancestor (MRCA) of taxon G and taxon K, create a file fake_fossil.cal with the following text:
1
-t	G	K	1.5
This specifies that you have a single fossil calibration node, that the fossil is dated at 1.5 time units, and it is calibrating the MRCA of G and K.
We are now in position to run FDPPDiv on simdata.dat. Type the follow to initiate the analysis:
./dppdiv-seq-sse -in simulated.dat -tre yulesim.txt -cal fake_fossil.cal -tga -clok -abs -rb 1.0 -out test -n 100000 -pf 1000 -sf 100
Here is a rundown of some of the things you specified on the command line:
- -in specifies the name of the data file
- -tre specifies the name of the tree file (dppdiv requires that you specify a tree topology)
- -cal specifies the name of the fossil calibration file
- -clok specifies that the program should assume a strict molecular clock and not allow rates to vary across edges
- -abs specifies that you would like the node ages to be absolute rather than relative
- -rb specifies the rate parameter of the exponential prior on the (strict clock) rate
- -out specifies the prefix used to name output files
- -n specifies the number of MCMC iterations
- -pf specifies the print frequency (how many iterations elapse before you get a progress report)
- -sf specifies the sampling frequency (how many iterations elapse before a sample is saved)
Evaluating the output of FDPPDiv
FDPPDiv will take about 15-20 minutes to run. You can start answering the questions below as it runs.
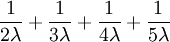
- Looking at the diagram of a Yule tree below, can you derive a formula for the expected tree length (sum of all branch lengths)?

Answer: The expected length of each of the bottom-most 2 edges is  , and there are 2 of these edges, so the expected tree length of this bottom-most "epoch" is just
  .
.
Note that the second epoch has 3 edges each of which has an expected length of  , so the expected tree length of this epoch is also
  .
.
Letting  equal the number of tips (5 in this example), the total expected tree length is thus
  because there are
  epochs and the contribution of each epoch to the total expected tree length is .
- What about the expected tree height (distance from any tip to the root node)?
Answer: This one is easier: the expected tree height is just the sum of the expected splitting times:
 .
.
Once FDPPDiv finishes, load the file test.nodes.out into Tracer to answer the following questions.
- What is the expected diversification rate (birth rate - death rate)? answer
- What is the estimated diversification rate? Look at the estimate for NetDiv(b-d) answer
- What is the expected substitution rate? answer
- What is the estimated substitution rate? Look at the estimate for ave.subrate answer
- What is the expected tree height? answer
- What is the estimated tree height? Look for RootDepth.time(N20) answer
- What is the estimated age of your calibrated node? How does it compare to the true age of this node? answer
- Why are all the SRate(Nx) parameters identical? answer
Take a look at the figure on the right (from the April 17 lecture) before trying to answer the next question.

- What is the marginal posterior probability of the fossil being a "dead end"? That is, in what fraction of MCMC samples was the fossil at the end of an extinct lineage ("dead end"), versus direct ancestry where the fossil was part of a lineage that persists to the present day? Look for I_f(C0.ndxx), where xx is the node you chose to calibrate. answer
- What do you expect this value to be? answer
- How much time is there (on average) between your calibrated node's age and the age of your fossil? How does this compare with the truth? Look for cal.dist(C0.ndxx), where xx is the number of your calibrated node. answer
Hopefully this lab has given you some feeling for how to run FDPPDiv to estimate divergence times. As is always the case with a 2 hour lab, we did not have time to run the FDPPDIV program as long as we should, but the goal here is to learn how to run the program and interpret the results, and hopefully those goals were accomplished.
The model used in FDPPDiv is being incorporated into several major phylogenetic software programs, including BEAST, MrBayes and the new RevBayes successor to MrBayes, so you have gotten a preview of a method that you will probably see a lot more of in the next few years.